how to make a recycled paper bird nest
I've got a fun spring tutorial for you today! It's an easy to make nest out of recycled paper and Multi Medium. By using Multi Medium instead of white glue you can create this nest using less layers of paper! Makes for a very quick project!

Here are a few little birdies from my Paper Bird Printable kit looking right at home sitting in the nest!You can also use your nest for Easter eggs too! Read on to see how I created mine!

Shred old book pages and brown paper bag in your shredder. Cover a bowl with plastic wrap. I didn’t have any plastic wrap so I used a plastic grocery bag and it worked great!


Continue until you’ve covered the bottom of the bowl and little bit of the sides. Once you have a smooth layer of shredded papers on, add a final coat of multi medium and sprinkle on another layer of shredded papers so that it give the outside a messy birds nest look.
 Paint a few craft store wooden eggs to place inside! Here I painted eggs using Claudine Hellmuth Studio paints in Blank Canvas, Painterly Pink, Dash of Red, Yellow Pastel and Sky Blue mixed with Classic Teal
SUPPLIES USED FOR THIS PROJECT:
Old book pages and brown paper bags
Small bowl
Plastic wrap or plastic grocery bag
affiliate links
Here are a few little birdies from my Paper Bird Printable kit looking right at home sitting in the nest!You can also use your nest for Easter eggs too! Read on to see how I created mine!
Shred old book pages and brown paper bag in your shredder. Cover a bowl with plastic wrap. I didn’t have any plastic wrap so I used a plastic grocery bag and it worked great!
Apply Multi medium to your surface and glue on shredded papers
Continue until you’ve covered the bottom of the bowl and little bit of the sides. Once you have a smooth layer of shredded papers on, add a final coat of multi medium and sprinkle on another layer of shredded papers so that it give the outside a messy birds nest look.
SUPPLIES USED FOR THIS PROJECT:
Old book pages and brown paper bags
Small bowl
Plastic wrap or plastic grocery bag
affiliate links
Labels: Claudine Hellmuth Studio, free projects, free tutorial
tattered inspiration & a giveaway!
Tim Holtz is having a super fun blog hop and giveaway with his lovely Tattered Florals Die! I've got a tutorial for you and then look for the GIVEAWAY at the end of this post!
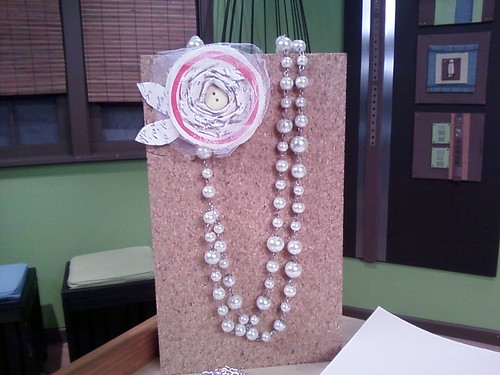
 For my project using the Tattered Florals Die, I created a Sticky Back canvas brooch that you can pin to a necklace, to your scarf or jacket!
SUPPLIES:
Tim Holtz Sizzix Tattered Florals die
Claudine Hellmuth Studio Stick Back Canvas in Natural 8.5x11"
Claudine Hellmuth Studio Painterly Pink paint
Claudine Hellmuth Studio Multi Medium
Ink Blending tool with foam
Button
Pin Back
Sand paper


THE GIVEAWAY DETAILS:
A big Thanks to Tim Holtz, for being so generous and sending me a Tattered Florals die to GIVEAWAY to one of you!
UPDATE WE HAVE A WINNER! winner has been picked! Congrats to Suzanne!! We'll have another giveaway very soon! thanks for playing!

UPDATE WE HAVE A WINNER! SCROLL DOWN TO SEE WHO WON!
SUPPLIES:
Tim Holtz Sizzix Tattered Florals die
Claudine Hellmuth Studio Stick Back Canvas in Natural 8.5x11"
Claudine Hellmuth Studio Painterly Pink paint
Claudine Hellmuth Studio Multi Medium
Ink Blending tool with foam
Button
Pin Back
Sand paper
affiliate links
Start with a piece of 8.5x11" Natural Sticky Back Canvas and print a handwriting image onto it using your inkjet printer
Peel off the backing paper from the Sticky Back Canvas
Fold it in half so both sides stick together
Cut using the Tattered Florals die on your die cutting machine
Sand the edges of your Sticky Back Canvas Flowers to distress them by rubbing the edges on sandpaper
Squeeze out a small amount of paint onto your Craft Sheet
Using the ink blending tool, dip the foam into the paint and then brush lightly over the edges of the flower.
Scrunch up the flowers to give them dimension. Then set the flower pieces aside. Now we are going to make the center of the flower!
Cut a 2" square piece of Sticky Back Canvas and a 1" x 11" long strip. Make a small cut in the top of the strip of Sticky Back Canvas
Tear the strip of Sticky Back Canvas in half lengthwise
Peel off the paper backing from the square of Sticky Back canvas and leave the adhesive side facing up
Take the long strip of Sticky Back canvas and remove the paper backing, stick one end to the adhesive side of the canvas square.
Start rolling up your flower by twisting one 1/2 turn and then sticking the strip of canvas into the adhesive side of the canvas square in a circular motion.
Keep twisting and sticking and it will look like this!
Trim off the excess canvas around the flower
Lightly tap on a little bit of Painterly Pink paint using the link blending tool
Apply Multi medium to the center of the largest flower
Layer up all the flowers, adding Multi Medium in between each layer.
Add a button using Multi Medium to the center of your flower
Add a pin back to the back of the flower. I glued mine on with more Multi Medium!
Pin your flower to an old necklace and wear! Or pin it to a scarf, a hat or a jacket!
THE GIVEAWAY DETAILS:
UPDATE WE HAVE A WINNER! winner has been picked! Congrats to Suzanne!! We'll have another giveaway very soon! thanks for playing!

Labels: free projects, free tutorial, giveaway
quick valentines card
Here's a quick and easy Valentine's Day card that you can whip up in minutes using my new stencils and a couple items I bet you already have in your craft room. Complete instructions over on the Ranger web site here!

Labels: Claudine Hellmuth Studio, free projects
last minute gift wrap tutorial
Don't miss this tutorial over on the Ranger Web site -- I'll show you how to make last minute gift wrap using Claudine Hellmuth Studio white gesso, my Creative Layers foam stamps and grocery store paper bags!

Labels: Claudine Hellmuth Studio, free projects, free tutorial
sticky back canvas bouquet
Here's a little article that I wrote for the latest issue of Somerset Holidays and Celebrations. How to make a Sticky Back Canvas flower bouquet!

Labels: Claudine Hellmuth Studio, free projects
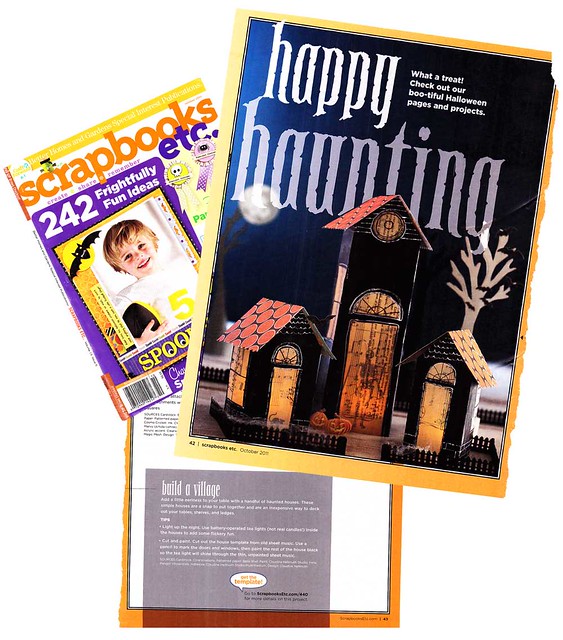
easy to make halloween decorations
In the October Issue of Scrapbooks etc I wrote a little article on how to create a cute haunted village for your mantle. This little project is an easy way to decorate for Halloween and inexpensive too!
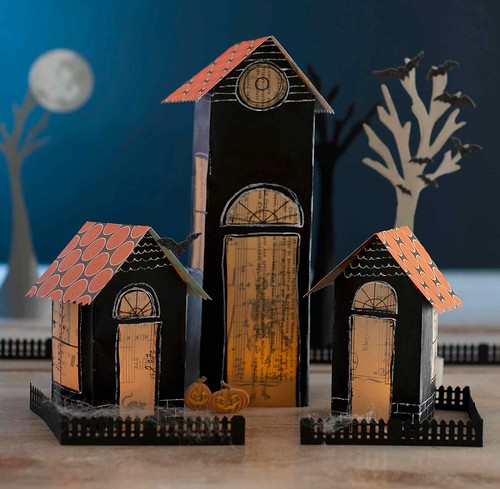
If you'd like to see step by step instructions, click here!
Enjoy!
Here's the PDF template for the houses - Download here!
If you'd like to see step by step instructions, click here!
Enjoy!
Labels: Claudine Hellmuth Studio, free projects, free tutorial
acrylic painting on a transparency
Don't miss this wonderful technique by Linda Duke! Here she shows how to use Claudine Hellmuth Studio Paints on a transparency to create a beautiful card. This technique is amazing!
Visit Linda's blog for more photos and even more detailed instructions!
Labels: Claudine Hellmuth Studio, free projects, free tutorial
how to glue papers with gel medium
Here's a quickie tutorial on how to glue collage papers. The process is simple and with practice, you'll never have to worry about air bubbles again!
I often get asked how to glue papers with gel medium and not get bubbles. There is a little trick to it and I'll show you my technique! Using gel medium to glue your layouts or artwork is a great way to protect your work, you'll create a smooth, waterproof and archival surface which will stand the test of time.
First let's talk about what gel medium is. Gel medium is essentially acrylic paint without the pigment, so it dries clear. It is used to seal surfaces as a type of varnish, you can mix it with your acrylic paint to make the paint into glazes. And because it is archival and non-yellowing many people like to use it as their glue.I have used gel medium as my glue for 22 years and I can't even think about using anything else!
Many different companies make gel medium and some are thicker or thinner than others, some come in a matte finish, semi-gloss or gloss etc.
I got to create my own DREAM gel medium with Ranger that has all the elements needed to make it perfect for mixed media use! I'll be using my Multi-Medium in Matte from the Claudine Hellmuth Studio product line for this demo.
Here are the supplies you'll need:
FTC Disclosure: the links above are affiliate links. If you click and make a purchase, I will earn a small referral fee. I appreciate your clicks and support!
I often get asked how to glue papers with gel medium and not get bubbles. There is a little trick to it and I'll show you my technique! Using gel medium to glue your layouts or artwork is a great way to protect your work, you'll create a smooth, waterproof and archival surface which will stand the test of time.
First let's talk about what gel medium is. Gel medium is essentially acrylic paint without the pigment, so it dries clear. It is used to seal surfaces as a type of varnish, you can mix it with your acrylic paint to make the paint into glazes. And because it is archival and non-yellowing many people like to use it as their glue.I have used gel medium as my glue for 22 years and I can't even think about using anything else!
Many different companies make gel medium and some are thicker or thinner than others, some come in a matte finish, semi-gloss or gloss etc.
I got to create my own DREAM gel medium with Ranger that has all the elements needed to make it perfect for mixed media use! I'll be using my Multi-Medium in Matte from the Claudine Hellmuth Studio product line for this demo.
Here are the supplies you'll need:
| | | | |
Labels: Claudine Hellmuth Studio, free projects, free tutorial
multi medium transfer onto metal
Here's a quickie tutorial on how to transfer images to metal using Claudine Hellmuth Studio Multi Medium in matte! The process is simple and easy (the longest part is waiting for everything to dry!) I hope you enjoy!
Here are the supplies you'll need:

FTC Disclosure: the links above are affiliate links. If you click and make a purchase, I will earn a small referral fee. I appreciate your clicks and support!
Here are the supplies you'll need:
FTC Disclosure: the links above are affiliate links. If you click and make a purchase, I will earn a small referral fee. I appreciate your clicks and support!
Labels: Claudine Hellmuth Studio, free projects, free tutorial
make a canvas flower necklace
Last December I taped a segment on the Beads Baubles and Jewels PBS show that taped with my friend Katie Hacker who is the host!
In this video I show you how to make this cute Sticky Back Canvas Flower pin that you can add easily to any necklace or wear on your jacket!
You can purchase Claudine Hellmuth Studio Sticky Back Canvas, paints and foam stamps at your local craft store or online!
In this video I show you how to make this cute Sticky Back Canvas Flower pin that you can add easily to any necklace or wear on your jacket!
You can purchase Claudine Hellmuth Studio Sticky Back Canvas, paints and foam stamps at your local craft store or online!
Labels: Claudine Hellmuth Studio, free projects, free tutorial
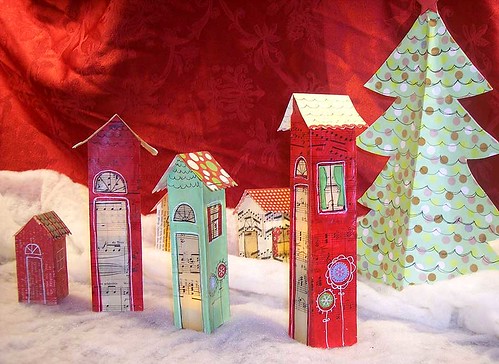
easy to make paper luminary holiday village
Here's a fun paper village that is easy to make and will add lots of Christmas cheer to your home! The best part about this little village is that it will cost you next to nothing to make, I am betting you already have many of these items around your house!
I have posted this tutorial a couple times, but it's a such a favorite of mine for the holidays here it is again!
Suggested supply list:
 STEP ONE: Put the house template (download here) on top of a sheet of old music paper and trace around it with a pencil and then cut it out.
 STEP TWO: Draw in where you would like the windows and doors to go.
 STEP THREE: Paint in the house. Paint around all the doors and windows leaving them unpainted. Here I am using Dash of Red from the Claudine Hellmuth Studio Line. If you are using these paints, you will notice that they remain transparent and you can still see the music notes even through the color, making a really beautiful effect!

STEP FOUR: Here I added details. I used Claudine Hellmuth Studio Sticky Back Canvas to make the curtains, a black pen and the Ranger Inkssentials White Pen.
 STEP FIVE: Fold all your edges and then glue the tab to the other side of the house with Claudine Hellmuth Studio Multi Medium.

STEP SIX: Pinch the sides to shape the house.
 STEP SEVEN: Place the roof template on a piece of scrapbook paper, trace around and cut out
 STEP EIGHT: Fold down the center and then add details. Here I added trim but cutting a piece of Sticky Back Canvas
 STEP NINE: Put the roof on your house and then place a BATTERY OPERATED tea light candle underneath. DO NOT use a regular tea light candle with flame because it will catch your mini house on fire! You can find Battery tea light candles at home stores like Bed Bath and Beyond, Dollar Store or at your local craft store.
 YOU'RE DONE! Here's the little house ready to bring Christmas cheer! It was difficult to capture just how glowing the houses are with the battery tea lights underneath. When you make yours, you will see how magical they are!
 Now make a whole bunch more and display them on your mantle! A perfect Holiday Village for your home!
WHERE TO BUY:
Check your local crafts/scrapbook or arts supply store for availability. Claudine Hellmuth Studio Products are for sale online at Ellen Hutson LLC. Google for more online locations. For more videos and information about the Claudine Hellmuth Studio product line, visit my web site!
I have posted this tutorial a couple times, but it's a such a favorite of mine for the holidays here it is again!
Suggested supply list:
- Old Music papers and assorted scrapbook papers
- Claudine Hellmuth Studio Paint in Dash of Red, Landscape Green
- Claudine Hellmuth Studio Multi Medium (matte or gloss)
- Claudine Hellmuth Studio Paint brushes
- Claudine Hellmuth Studio Sticky Back Canvas
- Ranger Inkssentials White Pen
- A back pen (I like the Faber Castell PITT in size S)
- Pencil
- a BATTERY operated tea light candle (no flames please!!!)
- Template for the houses - I made one for you! Download here!
 STEP ONE: Put the house template (download here) on top of a sheet of old music paper and trace around it with a pencil and then cut it out.
 STEP TWO: Draw in where you would like the windows and doors to go.
 STEP THREE: Paint in the house. Paint around all the doors and windows leaving them unpainted. Here I am using Dash of Red from the Claudine Hellmuth Studio Line. If you are using these paints, you will notice that they remain transparent and you can still see the music notes even through the color, making a really beautiful effect!
STEP FOUR: Here I added details. I used Claudine Hellmuth Studio Sticky Back Canvas to make the curtains, a black pen and the Ranger Inkssentials White Pen.
 STEP FIVE: Fold all your edges and then glue the tab to the other side of the house with Claudine Hellmuth Studio Multi Medium.
STEP SIX: Pinch the sides to shape the house.
 STEP SEVEN: Place the roof template on a piece of scrapbook paper, trace around and cut out
 STEP EIGHT: Fold down the center and then add details. Here I added trim but cutting a piece of Sticky Back Canvas
 STEP NINE: Put the roof on your house and then place a BATTERY OPERATED tea light candle underneath. DO NOT use a regular tea light candle with flame because it will catch your mini house on fire! You can find Battery tea light candles at home stores like Bed Bath and Beyond, Dollar Store or at your local craft store.
 YOU'RE DONE! Here's the little house ready to bring Christmas cheer! It was difficult to capture just how glowing the houses are with the battery tea lights underneath. When you make yours, you will see how magical they are!
 Now make a whole bunch more and display them on your mantle! A perfect Holiday Village for your home!
WHERE TO BUY:
Check your local crafts/scrapbook or arts supply store for availability. Claudine Hellmuth Studio Products are for sale online at Ellen Hutson LLC. Google for more online locations. For more videos and information about the Claudine Hellmuth Studio product line, visit my web site!
Labels: Claudine Hellmuth Studio, free projects
 Name:claudine hellmuth